Background
I was trying to secure my Spring Boot based REST Endpoints using Google Authentication. I was not able to find a satisfactory example online. Most of the examples I found would use the classic OAuth2 Pattern, wherein, the user is redirected to Google Authentication Page, the user enters the credentials and then, he is redirected back to the actual site. This, in my mind, is very UI-centric.
This is not the pattern I had in mind. I wanted to build a pure REST solution. I wanted to solve the use case where the user has already obtained the OAuth2 token, and now, he is using that token in the Header with each REST call. All the backend needs to do is to validate whether this Header is a valid Oauth2 Token and extract the Name, Email and Roles of the Principal from it. If there is no Token or the Token is invalid, the call with simply fails with a 401 error.
If you think about the implementation, from a high level, of course, it has to be some kind of a Filter, which is invoked for a set of REST Endpoints that we are securing. This Filter will do the validation of the Authentication Token. The trick is: how to tie this all up with Spring Boot or rather Spring Security?
Getting Started
You need to do some ground work to register in the Google Credential Console before we can proceed. I have described that in my previous post, Google Authentication with ReactJS and Typescript.
Next, we will develop a simple Spring Boot REST application that works with the above Frontend ReactJS Code. The application that we are creating will have the same set of REST Endpoints as the one described here Google Authentication with PHP REST Server.
Implementation
Google library to use
We would be using the below Google library to verify whether the OAuth2 Token is a valid one and extract Name, Email etc. from it.
<dependency>
  <groupId>com.google.api-client</groupId>
  <artifactId>google-api-client</artifactId>
  <version>1.30.4</version>
</dependency>
The Filter to use
As mentioned, we would have to use a Filter of some kind, that provides a hook into Spring Security. After much deliberation, I have decided to use the AuthenticationFilter as it is both simple and customizable.
Customizing the AuthenticationFilter
The AuthenticationFilter has two constructors. We will use the one which takes in a AuthenticationManager and a AuthenticationConverter.
AuthenticationManager
As the name indicates, the AuthenticationManager is responsible for authenticating a request. It takes in an Authentication object and then verifies whether it is a valid OAuth2 token by using the GoogleTokenVerifier. After successful verification, it extracts the Name and Email from it. Then, it looks up the user table in the Database and tries to find an entry with that Email.
If the Email is found, the authentication is deemed successful and an Authentication object containing the ID, Name, Email and Roles is returned.
If the Email is not found, the authentication is deemed to have failed. It will throw a AuthenticationServiceException.
This is how the code looks like:
public class GoogleAuthenticationManager implements AuthenticationManager {

    private static final Logger LOGGER = LoggerFactory.getLogger(GoogleAuthenticationManager.class);

    private final UserDetailsRepository userDetailsRepository;

    public GoogleAuthenticationManager(UserDetailsRepository userDetailsRepository) {
	this.userDetailsRepository = userDetailsRepository;
    }

    @Override
    public Authentication authenticate(final Authentication authentication) {
	LOGGER.info("start authentication...");

	Payload payload = new GoogleTokenVerifier().verifyToken((String) authentication.getCredentials());

	String email = payload.getEmail();

	Optional<UserDetails> optUserDetails = userDetailsRepository.findByEmail(email);

	if (optUserDetails.isEmpty()) {
	    throw new AuthenticationServiceException("User not registered");
	}

	UserDetails userDetails = optUserDetails.get();

	return new UsernamePasswordAuthenticationToken(userDetails, "DontBotherBro",
		Arrays.asList(new SimpleGrantedAuthority(userDetails.getRole().name())));
    }

}
Notice how we wrap our own custom class UserDetails into the Authentication object, as the first constructor argument in the UsernamePasswordAuthenticationToken.
Later, in any Service or Controller, the UserDetails can be obtained very easily from the Authentication object using the below code:
    @GetMapping
    public UserDetails applyCorrectionToOcrWords(Authentication authentication) {
	     LOGGER.debug("Authentication: {}", authentication);
	     return (UserDetails) authentication.getPrincipal();
    }
This will get the UserDetails as well:
Authentication authentication = SecurityContextHolder.getContext().getAuthentication();
LOGGER.debug("Authentication from POST: {}", authentication);
UserDetails userDetails = (UserDetails) authentication.getPrincipal();
This code can be found in the WhoAmIController.
AuthenticationConverter
The AuthenticationConverter helps us to extract the Header Token from the HttpServletRequest. It converts the raw token into an Authentication object for further processing by the AuthenticationManager.
This is how the code looks like:
public class AuthenticationTokenExtractor implements AuthenticationConverter {

    private static final Logger LOGGER = LoggerFactory.getLogger(AuthenticationTokenExtractor.class);

    public static final String AUTH_TOKEN_NAME = "Authorization";

    @Override
    public Authentication convert(HttpServletRequest request) {

	String path = request.getServletPath();

	String idToken = request.getHeader(AUTH_TOKEN_NAME);

	if (!StringUtils.hasText(idToken)) {
	    LOGGER.warn("No auth token found for {}", path);
	    throw new PreAuthenticatedCredentialsNotFoundException("Auth Token not found");
	}

	LOGGER.debug("Auth token FOUND for {}", path);

	return new PreAuthenticatedAuthenticationToken("", idToken);
    }

}
The PreAuthenticatedAuthenticationToken takes in the Principal as the first argument and credentials as the second. Since the Principal can only be obtained after Authentication, we can leave that out.
AuthenticationSuccessHandler
A AuthenticationSuccessHandler defines what to do in case of a successful authentication. The default implementation in a AuthenticationFilter is the SavedRequestAwareAuthenticationSuccessHandler, which would redirect to the root context / on successful authentication.
I first started out with the default implementation. However, my request failed, even after successful authentication. This is the stack trace:
2021-10-30 09:19:17.410 DEBUG 3742 --- [nio-8000-exec-7] o.s.security.web.FilterChainProxy        : Secured GET /
2021-10-30 09:19:17.413 ERROR 3742 --- [nio-8000-exec-7] o.a.c.c.C.[.[.[/].[dispatcherServlet]    : Servlet.service() for servlet [dispatcherServlet] in context with path [] threw exception [Request processing failed; nested exception is java.lang.IllegalStateException: Cannot call sendError() after the response has been committed] with root cause

java.lang.IllegalStateException: Cannot call sendError() after the response has been committed
	at org.apache.catalina.connector.ResponseFacade.sendError(ResponseFacade.java:472) ~[tomcat-embed-core-9.0.53.jar:9.0.53]
	at javax.servlet.http.HttpServletResponseWrapper.sendError(HttpServletResponseWrapper.java:129) ~[tomcat-embed-core-9.0.53.jar:4.0.FR]
	at javax.servlet.http.HttpServletResponseWrapper.sendError(HttpServletResponseWrapper.java:129) ~[tomcat-embed-core-9.0.53.jar:4.0.FR]
	at org.springframework.security.web.util.OnCommittedResponseWrapper.sendError(OnCommittedResponseWrapper.java:116) ~[spring-security-web-5.5.2.jar:5.5.2]
	at javax.servlet.http.HttpServletResponseWrapper.sendError(HttpServletResponseWrapper.java:129) ~[tomcat-embed-core-9.0.53.jar:4.0.FR]
	at org.springframework.security.web.util.OnCommittedResponseWrapper.sendError(OnCommittedResponseWrapper.java:116) ~[spring-security-web-5.5.2.jar:5.5.2]
	at org.springframework.web.servlet.resource.ResourceHttpRequestHandler.handleRequest(ResourceHttpRequestHandler.java:526) ~[spring-webmvc-5.3.10.jar:5.3.10]
After careful analysis, I figured out that the ResourceHttpRequestHandler cannot find the root context / as I have not defined one, and thats the reason, it sets an error response after redirect, and hence the issue.
I am pasting the below code from ResourceHttpRequestHandler:
@Override
public void handleRequest(HttpServletRequest request, HttpServletResponse response)
    throws ServletException, IOException {

  // For very general mappings (e.g. "/") we need to check 404 first
  Resource resource = getResource(request);
  if (resource == null) {
    logger.debug("Resource not found");
    response.sendError(HttpServletResponse.SC_NOT_FOUND);
    return;
  }
  ...
}
And the reason for all this is that the default success url is /.
So, what we could do is, define our own AuthenticationSuccessHandler where, we will pretty much do nothing. We use the SimpleUrlAuthenticationSuccessHandler and set our own RedirectStrategy, which will, again do nothing.
SimpleUrlAuthenticationSuccessHandler successHandler = new SimpleUrlAuthenticationSuccessHandler();
successHandler.setRedirectStrategy((request, response, url) -> {
});
RequestMatcher
The default implementation of the RequestMatcher in the is to match any incoming request. However, that will not work for us, as we would like some endpoints like Swagger UI, H2 Console and Actuator to be available without authentication.
We need to use a custom RequestMatcher. We have some 10 odd URLs that we need to allow without authentication. We use Stream Functions to transform each of these URLs into a AntPathRequestMatcher. This, we feed into a OrRequestMatcher and then use a NegatedRequestMatcher to top it all. At the end, we have defined a RequestMatcher that works only when these given URLs do not match, which means that pretty much every thing else is authenticated.
String[] URLS_TO_ALLOW_WITHOUT_AUTH = { "/v2/api-docs", "/configuration/**",
  "/swagger-ui.html", "/swagger*/**", "/webjars/**", "/h2-console/**", "/actuator/**" };
RequestMatcher requestMatcher =
  new NegatedRequestMatcher(new OrRequestMatcher(Arrays.stream(URLS_TO_ALLOW_WITHOUT_AUTH)
    .map(pattern -> new AntPathRequestMatcher(pattern)).collect(Collectors.toList())));
CORS configuration
Though CORS is not an absolute necessity for this to get working, it still is an important piece. This is how our CORS configuration looks like:
private CorsConfigurationSource corsConfigurationSource() {
CorsConfiguration corsConfiguration = new CorsConfiguration();
corsConfiguration.setAllowedOrigins(Arrays.asList("http://localhost:3000"));
corsConfiguration.addAllowedMethod(HttpMethod.GET);
corsConfiguration.addAllowedMethod(HttpMethod.PUT);
corsConfiguration.addAllowedMethod(HttpMethod.POST);
corsConfiguration.addAllowedMethod(HttpMethod.DELETE);
corsConfiguration.addAllowedMethod(HttpMethod.OPTIONS);
corsConfiguration.addAllowedHeader("X-Requested-With");
corsConfiguration.addAllowedHeader("Content-Type");
corsConfiguration.addAllowedHeader("Accept");
corsConfiguration.addAllowedHeader("Origin");
corsConfiguration.addAllowedHeader("Authorization");
UrlBasedCorsConfigurationSource source = new UrlBasedCorsConfigurationSource();
source.registerCorsConfiguration("/**", corsConfiguration);
return source;
}
Putting it all together
All of this will come together when we extend the WebSecurityConfigurerAdapter to define our own Configuration as shown below:
@Configuration
@EnableWebSecurity
@EnableGlobalMethodSecurity(prePostEnabled = true, securedEnabled = true, jsr250Enabled = true)
public class SecurityConfig extends WebSecurityConfigurerAdapter {

    private static final String[] URLS_TO_ALLOW_WITHOUT_AUTH = { "/v2/api-docs", "/configuration/**",
	    "/swagger-ui.html", "/swagger*/**", "/webjars/**", "/h2-console/**", "/actuator/**" };

    @Autowired
    private UserDetailsRepository userDetailsRepository;

    @Override
    protected void configure(HttpSecurity http) throws Exception {
	http.cors(config -> config.configurationSource(corsConfigurationSource())).authorizeRequests()
		.antMatchers(URLS_TO_ALLOW_WITHOUT_AUTH).permitAll().anyRequest().authenticated().and()
		.addFilterBefore(authenticationFilter(), BasicAuthenticationFilter.class).csrf().disable().headers()
		.frameOptions().sameOrigin().httpStrictTransportSecurity().disable();
    }

    @Override
    protected AuthenticationManager authenticationManager() {
	return new GoogleAuthenticationManager(userDetailsRepository);
    }
    ...
  }
Notice how we place our AuthenticationFilter with .addFilterBefore(authenticationFilter(), BasicAuthenticationFilter.class).
Making it work
Remember, that in order for successful authentication, you would need an entry in the user table. You can do that with the H2 Web Console which is available at http://localhost:8000/h2-console/. The JDBC URL would be jdbc:h2:mem:library and the user name and passwords would be both sa.
Testing with CURL
Boot up the ReactJS Client and browse to http://localhost:3000/. You would see the login screen. Proceed to login with Google. Now hit F12 to open the Developer Console. From the Menu, select Book -> Add New.
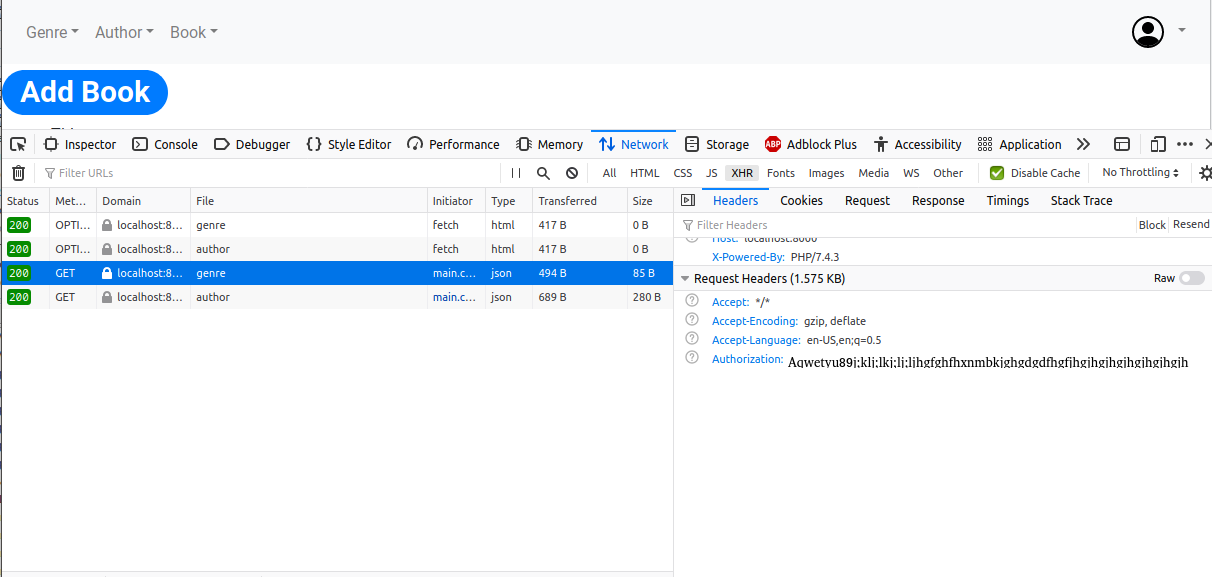
As shown above, you would be able to see the Authorization Header copy that. The curl command would be:
curl -v -H "Authorization: MySecretToken" "http://localhost:8000/genre"
Sources
The sources for this example can be found here: https://github.com/paawak/spring-boot-demo/tree/master/google-auth-with-spring-boot
The Frontend code can be found here: https://github.com/paawak/blog/tree/master/code/reactjs/library-ui-secured-with-google.