What is an MDB?
An MDB or Message Driven Bean is an Enterprise Bean that is capable of listening to JMS Messages and processing them asynchronously. It is a part of the Java EE Specification. In the days of yore, when Java EE ruled the roost, MDBs used to be one of the most sought-after programming paradigms. The fact that MDBs can take part in transactions with other resources like a Data Store, made it very attractive.
Example Use Case
In this example, we are going to write a simple MDB that prints the JMS message that it receives, on the console. We would be packaging the MDB within a war file. We would then deploy the war in WildFly. For the Message Broker, we would be using ActiveMQ Artemis that comes embedded within WildFly.
Note: ActiveMQ Artemis is actually an avatar of HornetQ, the MQ that used to be embedded in JBoss. JBoss donated the source code to Apache, and thus Artemis was born.
High Level Design
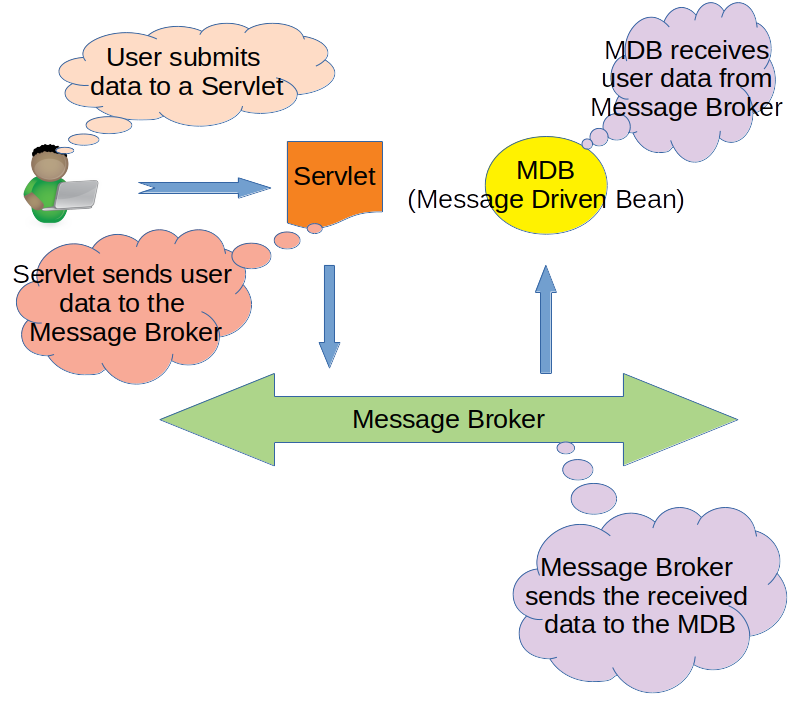
- User submits Form Data to a Servlet
- The Servlet then publishes this as a JSON Message to the Message Broker, Artemis MQ, in this case, through JMS API
- The Message Broker notifies the MDB of the JMS Message it has received
- The MDB receives the JMS Message and prints it on the console
Implementation Details
This is a normal Spring MVC project. It has added dependencies for JMS and Wildfly. Let’s start from the pom.xml.
The pom.xml
Dependencies
Apart from the usual Spring Web MVC dependency, we also need the below dependencies for JMS/MDB:
   		 javax.servlet
   		 javax.servlet-api
   		 3.1.0
   		 provided


   		 javax.jms
   		 jms-api
   		 1.1-rev-1
   		 provided


   		 javax.ejb
   		 ejb-api
   		 3.0


   		 org.wildfly
   		 wildfly-jms-client-bom
   		 18.0.0.Final
   		 pom
Plugins
We would need the war plugin to generate a war file. Since we would be taking advantage of the Servlet 3.0 specification and forego a web.xml, we have to put the failOnMissingWebXml attribute as false.
   			 maven-war-plugin
   			 2.4

   				 false
The complete pom.xml can be found here.
The Web Application Initializer
Post Servlet 3.0 specifications, a Java Web Application can be built with pure Java configuration, without a web.xml, for defining and mapping Servlets. Spring Web MVC takes it one step ahead and defines the interface WebApplicationInitializer, which can be implemented as below:
public class WebappInitializer implements WebApplicationInitializer {
	@Override
	public void onStartup(ServletContext servletContext) {
    // Create the dispatcher servlet's Spring application context
    AnnotationConfigWebApplicationContext dispatcherContext = new AnnotationConfigWebApplicationContext();
    dispatcherContext.register(WebConfig.class);
    // Register and map the dispatcher servlet
    ServletRegistration.Dynamic dispatcher = servletContext.addServlet("dispatcher", new DispatcherServlet(dispatcherContext));
    dispatcher.setLoadOnStartup(1);
    dispatcher.addMapping("/");
	}
}
The WebMvcConfigurer
The entry point of the annotation based Web Application Configuration is defined as below:
@Configuration
@EnableWebMvc
@ComponentScan("com.swayam.demo.mdb.artemis")
public class WebConfig implements WebMvcConfigurer {
	@Override
	public void configureMessageConverters(List> converters) {
    Jackson2ObjectMapperBuilder jackson2ObjectMapperBuilder = new Jackson2ObjectMapperBuilder();
    converters.add(new MappingJackson2HttpMessageConverter(jackson2ObjectMapperBuilder.build()));
    Jaxb2RootElementHttpMessageConverter jaxb2RootElementHttpMessageConverter = new Jaxb2RootElementHttpMessageConverter();
    converters.add(jaxb2RootElementHttpMessageConverter);
	}
	@Bean
	public ViewResolver viewResolver() {
    InternalResourceViewResolver viewResolver = new InternalResourceViewResolver();
    viewResolver.setViewClass(JstlView.class);
    viewResolver.setPrefix("/WEB-INF/jsp/");
    viewResolver.setSuffix(".jsp");
    return viewResolver;
	}
	@Bean
	public static PropertySourcesPlaceholderConfigurer propertyConfig() {
    return new PropertySourcesPlaceholderConfigurer();
	}
}
Defining the JMS Queue and QueueSession
The Queue and the QueueSession are high level abstractions defined by the JMS Specification for sending messages to a Queue. These need to be first defined in the WEB-INF/embedded-artemis-jms.xml, as shown below:
The same should be defined in the mdb.properties to access them from Java Configuration:
ARTEMIS_QUEUE_LOOKUP=queue/HELLOWORLDMDBQueue
ARTEMIS_JMS_CONNECTION_FACTORY=jms/RemoteConnectionFactory
WILDFLY_USER=user
WILDFLY_PASSWORD=user123
To access these from Java code, these are then defined in a Spring Configuration file as below:
@PropertySource("classpath:mdb.properties")
@Configuration
public class MdbConfig {
	private static final Logger LOGGER = LoggerFactory.getLogger(MdbConfig.class);
	@Autowired
	private Environment environment;
	@Bean
	public JndiTemplate jndiTemplate() {
    return new JndiTemplate();
	}
	@Bean
	public QueueConnectionFactory queueConnectionFactory(JndiTemplate jndiTemplate) throws NamingException {
    QueueConnectionFactory factory = jndiTemplate.lookup(environment.getProperty("ARTEMIS_JMS_CONNECTION_FACTORY"), QueueConnectionFactory.class);
    LOGGER.info("got the connection factory");
    return factory;
	}
	@Bean
	public Queue jmsQueue(JndiTemplate jndiTemplate) throws NamingException {
    Queue queue = jndiTemplate.lookup(environment.getProperty("ARTEMIS_QUEUE_LOOKUP"), Queue.class);
    LOGGER.info("got the queue");
    return queue;
	}
	@Bean(destroyMethod = "close")
	@Scope("prototype")
	public QueueConnection queueConnection(QueueConnectionFactory queueConnectionFactory) throws JMSException {
    QueueConnection queueConnection = queueConnectionFactory.createQueueConnection(environment.getProperty("WILDFLY_USER"), environment.getProperty("WILDFLY_PASSWORD"));
    LOGGER.info("created a connection");
    return queueConnection;
	}
	@Bean(destroyMethod = "close")
	@Scope("prototype")
	public QueueSession queueSession(QueueConnection queueConnection) throws JMSException {
    QueueSession queueSession = queueConnection.createQueueSession(false, QueueSession.AUTO_ACKNOWLEDGE);
    LOGGER.info("created a queueSession");
    return queueSession;
	}
}
Sending JMS Messages From the Controller
Once the Queue and QueueSession has been configured, we can use them to post messages to the Queue.
@RestController
@RequestMapping(path = "/rest")
public class AuthorRestController {
    private static final Logger LOGGER = LoggerFactory.getLogger(AuthorRestController.class);
    private final ObjectMapper objectMapper = new ObjectMapper();
    private final ApplicationContext applicationContext;
    private final Queue queue;
    public AuthorRestController(ApplicationContext applicationContext, Queue queue) {
   	 this.applicationContext = applicationContext;
   	 this.queue = queue;
    }
    @PostMapping(path = "/author", consumes = MediaType.APPLICATION_FORM_URLENCODED_VALUE)
    public String save(AuthorRequest authorRequest) throws JsonProcessingException, NamingException, JMSException {
   	 LOGGER.debug("authorRequest: {}", authorRequest);
   	 postMessageToJMS(objectMapper.writeValueAsString(authorRequest));
   	 return "success";
    }
    private void postMessageToJMS(String message) throws NamingException, JMSException {
   	 QueueSession session = applicationContext.getBean(QueueSession.class);
   	 QueueSender sender = session.createSender(queue);
   	 TextMessage textMessage = session.createTextMessage(message);
   	 sender.send(textMessage);
   	 LOGGER.info("sent message: {}", textMessage);
    }
}
Configuring the MDB Receive JMS Messages
Configuring the MDB is simple, and would require just a couple of annotations as shown below:
package com.swayam.demo.mdb.artemis.listener;
import javax.ejb.ActivationConfigProperty;
import javax.ejb.MessageDriven;
import javax.jms.JMSException;
import javax.jms.Message;
import javax.jms.MessageListener;
import javax.jms.TextMessage;
import org.slf4j.Logger;
import org.slf4j.LoggerFactory;
@MessageDriven(activationConfig = {
	@ActivationConfigProperty(propertyName = "destinationType",
		propertyValue = "javax.jms.Queue"),
	@ActivationConfigProperty(propertyName = "destination",
		propertyValue = "queue/HELLOWORLDMDBQueue") })
public class AuthorRequestListenerBean implements MessageListener {
    private static final Logger LOGGER = LoggerFactory.getLogger(AuthorRequestListenerBean.class);
    @Override
    public void onMessage(Message message) {
	if (!(message instanceof TextMessage)) {
	    throw new UnsupportedOperationException("Expecting a " + TextMessage.class);
	}
	if (message instanceof TextMessage) {
	    TextMessage textMessage = (TextMessage) message;
	    try {
		LOGGER.info("Text message received: {}", textMessage.getText());
	    } catch (JMSException e) {
		LOGGER.error("exception reading messsage", e);
	    }
	}
    }
}
The standalone.xml
Lastly, we would need to modify the default standalone.xml that comes bundled with WildFly. First, copy the $WILDFLY_HOME/standalone/configuration/standalone.xml and rename it to standalone-with-embedded-artemis-mq.xml.
Adding the ActiveMQ Messaging Extension
Under the extensions section, we would need to add the below extension:
Defining the ActiveMQ Messaging SubSystem
We would need to define the new subsystem for ActiveMQ Messaging:
Adding the MDB Resource Adapter
Under the subsystem ejb3 section, we would need to add the details of the Resource Adapter to be used to communicate with the ActiveMQ Messaging system. This is added just after the session-bean section:
This is how the complete standalone-with-embedded-artemis-mq.xml looks like:
https://github.com/paawak/blog/blob/master/code/mdb-demo/wildfly/wildfly-embedded-artemis-demo/src/main/wildfly/standalone-with-embedded-artemis-mq.xml
Source Code
The complete source can be found here:
https://github.com/paawak/blog/tree/master/code/mdb-demo/wildfly/wildfly-embedded-artemis-demo
Running the Demo
Building the war
To build the war file, we do:
mvn clean package
Creating a Guest User in WildFly
Before we deploy the war file, we would need to create a user with a guest role in WildFly. This is done by invoking (from the command-prompt):
$WILDFLY_HOME/bin/add-user
When prompted, follow the steps to create an Application User with the name user, password user123, and role guest.
Deploying the war
Copy the wildfly-embedded-artemis-demo.war into the directory $WILDFLY_HOME/standalone/deployments.
Starting WildFly with our custom configuration
Copy the src/main/wildfly/standalone-with-embedded-artemis-mq.xml into the $WILDFLY_HOME/standalone/configuration/ directory. Then start WildFly with the below command:
$WILDFLY_HOME/bin/standalone.sh -c standalone-with-embedded-artemis-mq.xml
After WildFly starts successfully, you can access the Author page here:
http://localhost:8080/wildfly-embedded-artemis-demo/author.html
Enter all fields and hit the Save button. On the WildFly console, you would see the Json Message:
Text message received: {"authorId":1,"authorFirstName":"aaaa","authorLastName":"bbbb","genreShortName":"cccc","genreName":"dddd"}